Ladies at Pond Scenic Tutorial
|
I started by stamping all the images on scratch paper and cutting them out. This way you can freely move the images around and figure out what placement you prefer ahead of time. I then got four sheets of paper ready to stamp my scene on assembly line style. This way if I mess up on one, I still have three others to work on. This makes scenic stamping much less intimidating. |
 |
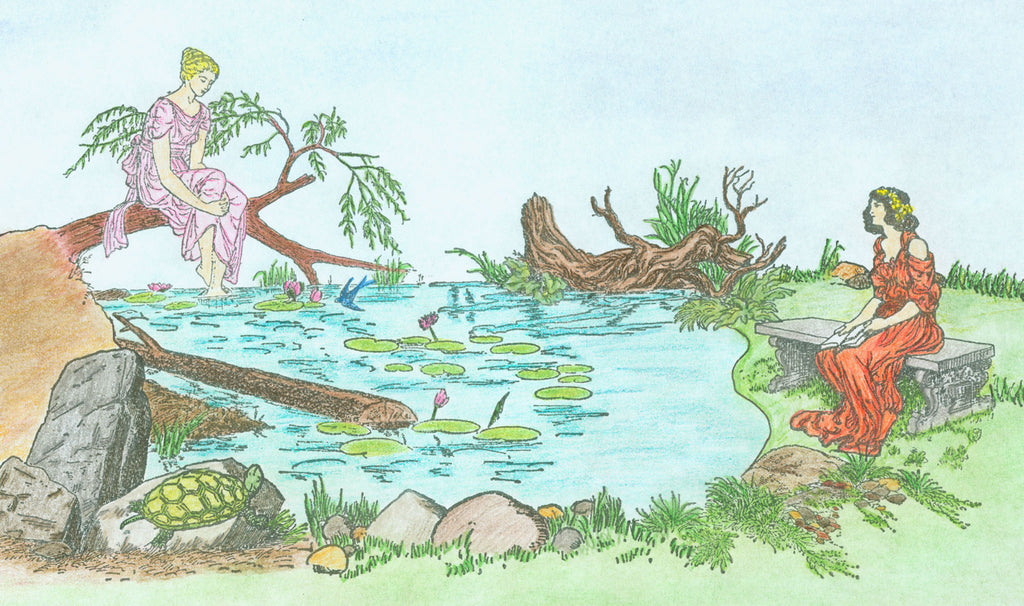
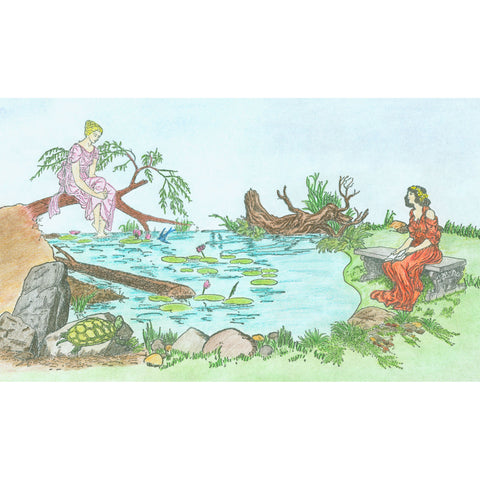
| I started by stamping the foreground. The first image that had to be stamped was the turtle. I then masked him and stamped the boulders over him. Make sure you over cut your masks so you don't get a blank halo around the masked image. I didn't like the placement of the turtle on the first try, so I readjusted my boulder placement on the next three so that the turtle was peeking over the rock. Now I have three good scenes left but I'll still use this "bad" one with the poorly placed turtle as my first scene to stamp on. |  |
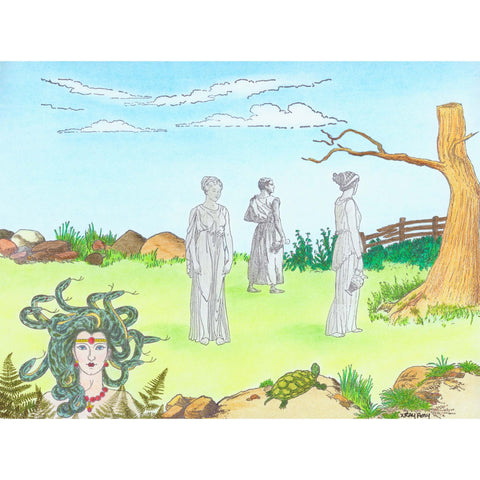
| After stamping all the foreground rocks, next is to figure out the placement of the woman and the pond log. I've used my paper cut outs again to help. Since I need to stamp the woman first, I'm using the cut outs to determine how high up to stamp her. Once I have the two where I want them I removed the pond log cut out and made a mental note of how high up to stamp the log woman. |  |
| To help me with her placement side to side, you can see that I'm using the tip of the line circled in red to stamp right over the center of the tall boulder. On the far image you can see that I've marked my stamp so I know exactly where that is while I'm stamping the image. |  |
| After stamping the log woman I masked her and masked the boulders to stamp the pond log. Next is the water log which I'll stamp to the right of the log woman. I did my same trick of marking the stamp here. This time I marked what is the horizon line on the water log so I could match it up with the horizon line on the log woman image. I've also masked the pond log water. |  |
| I hadn't planned on stamping the woman sitting on the bench in this scene, otherwise I would have stamped her earlier. However, after stamping my scene out I had a hole on the right that was perfect for her. I used my stamped cut out to make sure she fit and to help me figure out her placement for stamping. At this point I'm down to two "good" scenes. |  |
| After stamping the bench woman, I drew in the pond edge in front of her with a fine tip black marker. I've examined both of my good scenes and I've picked out the one I like the best. I'll use the "runner up" to test out colors as I decide what pencils and pastel chalks to use. |  |
| I like to color in the large areas with pastel chalks. I use a piece paper towel for an applicator. I fold a piece up, rub it on the chalk and then rub that on the paper. Always start with your lighter colors first. Pastel chalks can be erased so you don't have to worry too much about getting it on areas you don't want it on. Apply it and then simply erase it on areas you don't want it on. At this point I also realized I needed to complete the horizon line behind the woman sitting on the bench so I masked her and added the grass and rocks stamp. |  |
| Next I colored with colored pencils. I probably have 5 or 6 different brands that I use. That way I have more of a color selection. To make things look a bit more realistic, use two or three colors instead of coloring something in a monotone. Look at the water log as an example. I started coloring that with a light brown, then shaded with a darker brown. To blend the two together I colored over both with the same light brown I started with. |  |


Lady at Pond 470K
$ 6.40
3 1/2" x 2 1/4"
- Unmounted: Rubber die only
- Cling Mount: Rubber die on cling foam cushion closely trimmed (block not included)
- Wood Mount: Red rubber die with black foam cushion on a white maple wood mount
Click "View full product details" to see slideshow of artwork using this stamp.

Tall Boulders 621I
$ 5.50
3" x 2"
- Unmounted: Rubber die only
- Cling Mount: Rubber die on cling foam cushion closely trimmed (block not included)
- Wood Mount: Red rubber die with black foam cushion on a white maple wood mount
Click "View full product details" to see slideshow of artwork using this stamp.
Turtle 637C
$ 3.40
1 1/4" x 3/4"
- Unmounted: Rubber die only
- Cling Mount: Rubber die on cling foam cushion closely trimmed (block not included)
- Wood Mount: Red rubber die with black foam cushion on a white maple wood mount
Click "View full product details" to see slideshow of artwork using this stamp.

Log in Pond 545K
$ 6.40
5" x 1 3/4"
- Unmounted: Rubber die only
- Cling Mount: Rubber die on cling foam cushion closely trimmed (block not included)
- Wood Mount: Red rubber die with black foam cushion on a white maple wood mount
Click "View full product details" to see slideshow of artwork using this stamp.

Rocks in Grass 622G
$ 4.50
3 1/4" x 3/4"
- Unmounted: Rubber die only
- Cling Mount: Rubber die on cling foam cushion closely trimmed (block not included)
- Wood Mount: Red rubber die with black foam cushion on a white maple wood mount
Click "View full product details" to see slideshow of artwork using this stamp.

Grassy Boulder 538G
$ 4.50
2 3/4" x 1 1/2"
- Unmounted: Rubber die only
- Cling Mount: Rubber die on cling foam cushion closely trimmed (block not included)
- Wood Mount: Red rubber die with black foam cushion on a white maple wood mount
Click "View full product details" to see slideshow of artwork using this stamp.

Water Log 624H
$ 5.00
3 1/4" x 1 1/2"
- Unmounted: Rubber die only
- Cling Mount: Rubber die on cling foam cushion closely trimmed (block not included)
- Wood Mount: Red rubber die with black foam cushion on a white maple wood mount
Click "View full product details" to see slideshow of artwork using this stamp.
Sitting on Bench 453I
$ 5.50
2 1/4" x 2 1/2"
- Unmounted: Rubber die only
- Cling Mount: Rubber die on cling foam cushion closely trimmed (block not included)
- Wood Mount: Red rubber die with black foam cushion on a white maple wood mount
Grass & Stones 540E
$ 4.00
3 1/2 " x 1/2"
- Unmounted: Rubber die only
- Cling Mount: Rubber die on cling foam cushion closely trimmed (block not included)
- Wood Mount: Red rubber die with black foam cushion on a white maple wood mount
Click "View full product details" to see slideshow of artwork using this stamp.